Building our Greenhouse
- Clair Derwort

- Apr 16, 2020
- 3 min read


During the lockdown for Easter due to Covid 19, we used the time to be able to tackle some of our projects around the house instead of our usual family vaycay to Narooma on the East Coast. The biggest of these was to get our greenhouse complete before winter came.
As we've had few frost already here, the first was in the first week of February, we've been trying to find ways to maximise our growing season of summer veg.
The main ways we figured this to be possible included:
- building a greenhouse to either start seedlings early (last frost was first week of December here) or to grow warmer climate veg all year round in. Possibly to do both if we could plan the sizing right.
- to frost cover seeds with either up-cycled containers such as cut milk cartons or frost cloth like this one here.
- to only plant according to a cold climate. (But tomatoes, eggplant and chilli are life am I right!)

- Or, to start seeds inside on the kitchen window sill and then harden off and hope they're okay and to then frost cloth until we are well into December. Not ideal and with a climbing toddler I have no doubt anything on the sill would be far from safe.
Really the easiest solution was to build or buy a greenhouse. We looked at a few online which I did like the look of however we get strong winds and have a flood overlay so wanted to be sure of the sturdiness of it.
Ben being a builder thought it'd be ridiculous to buy one when he can make one. Of course I figured it'd be like most craft projects. Make something for $92 instead of buying one new for $15 but I was thankfully wrong. We agreed on the Ana White greenhouse and made a few changes to it to suit or needs.
You can find the original plans here and did I mention its a free plan too! Winning.

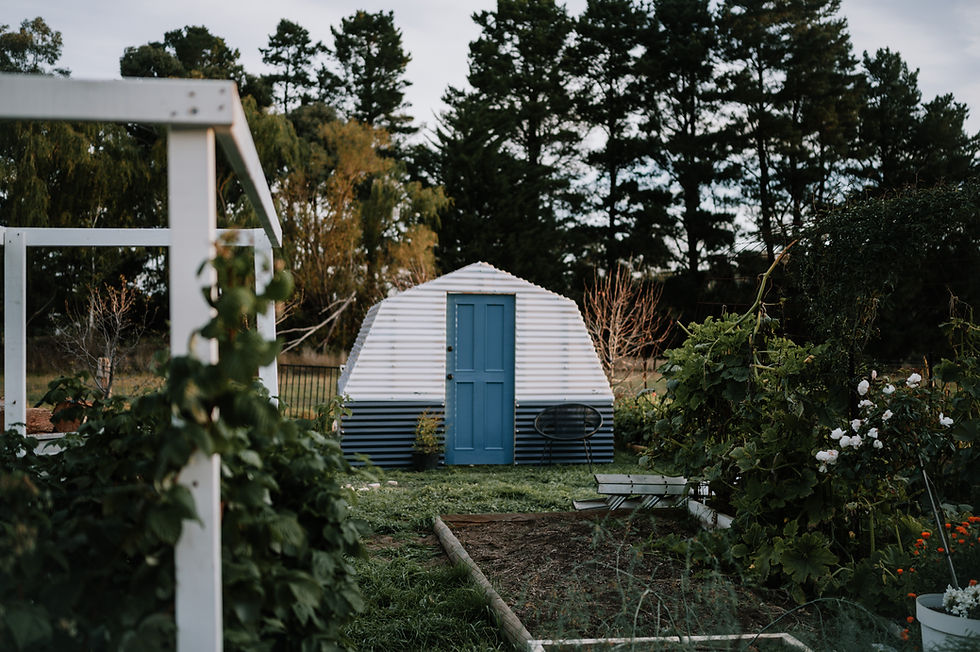
We opted to up-cycle our old back door to the house as it was solid timber and in reasonably good condition. We painted it in Taubman's Gloss Enamel in the Dulux colour: Oceanic.
We also somehow ended up with White Opal polycarbonate from Bunnings instead of the Clear we ordered. Given lockdown and the unnecessary travel it would involve to swap it plus the time to reorder the clear - we have built it and will see how it goes anyway presuming that the white should still allow enough light/lumens in to allow for plant growth. Time will tell - and if it fails we will replace it with clear.
Its all a learning experience gardening... especially when in a new climate to what you're used too.

We clad the bottom with Colorbond Deep Ocean and have made timber flashing and trims with left over forest red we used on our garden arbour.
Internally we put down geo fabric to stop weeds coming through and then topped it with Mt. William topping from Kyneton Garden Supplies. We built the shelving from timber we had around the farm and cut an IBC we also already had in half to use as a permanent wicking bed in the centre. You can learn how to make your own wicking bed here. (Link to come)


I will be checking the temperature daily and the humid inside the greenhouse to record the differences over the year and see what patterns occur etc to better my gardening but most importantly we are just going to try. Starting is the hardest step but gardening is addictive and you never stop learning new (or in some cases like hugelkulter) old, ways of doing things.
So now we just watch and wait to see how it goes but overall I have to say I'm incredibly impressed with our efforts so far. Especially having gotten all the kids involved too with both building it and planting out or first seeds.
For those of you wanting to build this yourselves here is what we ordered from Bunnings to save you converting the Ana White plan to Australian dimensions:

- 3 x 90 x 35 at 3m treated pine
- 5 x 90 x 35 at 3.6m treated pine
- 32 x 90 x 35 at 2.4m treated pine
- 11 x 3.6m polycarbonate sheeting
- 1 x 2.4m polycarbonate (this was the door which we didn't end up using)
- 5 x 2.4m (or 3 x 3.6m) colorbond sheets
- roofing screws we brought to x 100 packs and had leftovers
- nails or screws
Tools we used:
- paslode nail gun or you can screw it together with a drill if you don't have a nail gun
- angle grinder to cut poly and colorbond
- drop saw or circular saw to cut timber
- speed square to measure angles
- ladder
- hammer to gently bend sharp edges
Let us know if you too build this greenhouse or one similar and share with anyone you think could use this in their garden.
Clair.


It’s a super cute greenhouse and very roomy! Might have to make one myself! Is it anchored to the ground in any way?